使用 kubeasz 部署高可用 k8s 集群
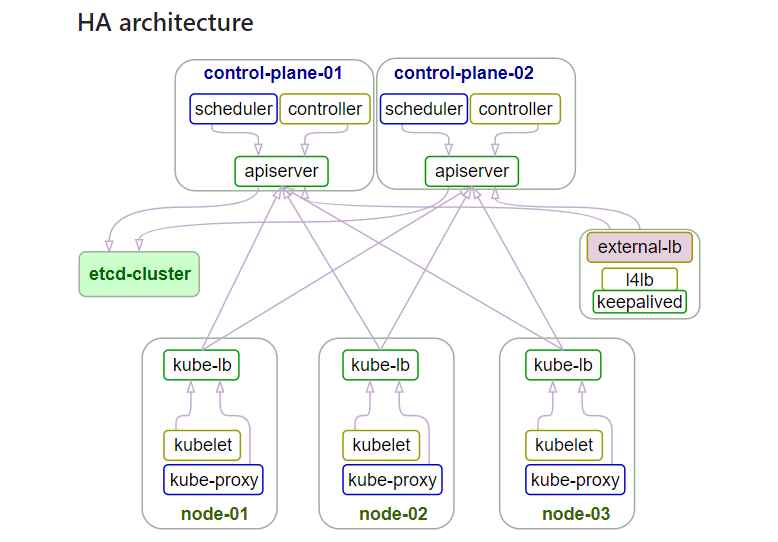
一、kubeasz 部署高可用 k8s 集群
官方网址:https://github.com/easzlab/kubeasz
kubeasz 致力于提供快速部署高可用k8s集群的工具, 同时也努力成为k8s实践、使用的参考书;基于二进制方式部署和利用 ansible-playbook 实现自动化;既提供一键安装脚本, 也可以根据安装指南分步执行安装各个组件。
1.1 k8s 集群信息
| 主机类型 | 服务器IP | 主机名 | VIP |
|---|---|---|---|
| K8S-Master1 | 10.243.20.230 | k8s-master1-230 | 10.243.20.250 |
| K8S-Master2 | 10.243.20.231 | k8s-master2-231 | 10.243.20.250 |
| K8S-Master3 | 10.243.20.232 | k8s-master3-232 | 10.243.20.250 |
| Harbor1 | 10.243.20.233 | k8s-harbor1-233 | |
| Harbor2 | 10.243.20.234 | k8s-harbor2-234 | |
| etcd1 | 10.243.20.235 | k8s-etcd1-235 | |
| etcd2 | 10.243.20.236 | k8s-etcd2-236 | |
| etcd3 | 10.243.20.237 | k8s-etcd3-237 | |
| Haproxy1+keepalived | 10.243.20.238 | k8s-ha1-238 | |
| Haproxy2+keepalived | 10.243.20.239 | k8s-ha2-deploy-239 | K8S 部署节点 |
| Node1 | 10.243.20.240 | k8s-node1-240 | |
| Node2 | 10.243.20.241 | k8s-node2-241 | |
| Node3 | 10.243.20.242 | k8s-node3-242 |
1.2 k8s 集群环境准备
1.2.1 软件清单
1 | OS version: Ubuntu 22.04.2 LTS |
1.2.2 相关参数初始化
系统内核优化
1 | cat >> /etc/security/limits.conf << EOF |
实验之前确保各节点时区一致、时间同步。
1 | # 确保时区一致 |
1.3 负载均衡配置
1.3.1 部署 keepalived
(1)第一台高可用节点 HA1 部署 keepalived
1 | root@k8s-ha1-238:~# apt -y install keepalived |
第二台高可用节点 HA2 部署 keepalived 同理,只需修改部分参数
global_defs {
router_id LVS_DEVEL2
} priority 80
unicast_src_ip 10.243.20.239
unicast_peer {
10.243.20.238
}检查HAproxy脚本
root@k8s-ha1-238:/etc/keepalived# cat check_haproxy.sh
#!/bin/bashif ! /usr/bin/killall -0 haproxy; then
systemctl restart haproxy.service &> /dev/null
if ! [ $? -eq 0 ]; then
systemctl stop keepalived.service
fi
fi
1.3.2 部署 HAproxy
(1)在 HA1 上部署 HAproxy 服务,HA2 配置相同
1 | root@k8s-ha1-238:~# apt -y install haproxy |
为了保证后续 HAproxy 节点可以正常使用需要开启 “net.ipv4.ip_nonlocal_bind=1”
echo “net.ipv4.ip_nonlocal_bind=1” >> /etc/sysctl.conf
sysctl -p
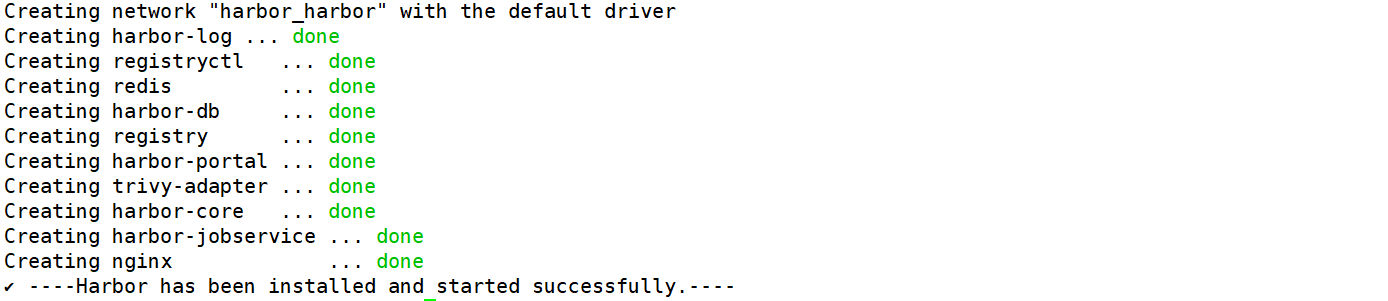
1.4 部署 Harbor
1.4.1 部署基于 https 的 Harbor 服务
(1)在 Harbor1 主机上部署 Harbor 服务,Harbor2 主机同理
1 | # 准备 Harbor 安装包 |
(2)配置 Harbor 服务开机自启动
1 | root@k8s-harbor1-233:~# cat /etc/rc.local |
Docker22.04 安装见此文章
https://wuhaolam.top/archives/99c33715.htmlharobor 离线安装包下载地址
https://github.com/goharbor/harbor/releases/download/v2.8.2/harbor-offline-installer-v2.8.2.tgz后续更改harbor.yml的配置文件,使用如下命令重启服务(在harbor安装目录)
- docker-compose down
- ./prepare
- docker-compose up -d
(3)配置 HAproxy https 反向代理至 Harbor 实现高可用
1 | # 准备证书文件 |
使用NGINX做反向代理负载均衡简要配置
==在http语句块中配置==
client_max_body_size 100m; # 允许客户端请求主体的最大大小,可以根据需要调整
upstream harbor_servers {
hash $remote_addr consistent;
server 192.168.119.112:80 weight=1 fail_timeout=5s max_fails=3;
server 192.168.119.113:80 weight=1 fail_timeout=5s max_fails=3;
}server {
listen 80;
listen 443 ssl;
ssl_certificate /apps/nginx/certs/harbor.wuhaolam.top.pem;
ssl_certificate_key /apps/nginx/certs/harbor.wuhaolam.top.key;
ssl_session_cache shared:sslcache:20m;
ssl_session_timeout 10m;
server_name harbor.wuhaolam.top;
add_header Strict-Transport-Security “max-age=31536000; includeSubDomains” always;location / {
if ( $scheme = http ) {
rewrite / https://harbor.wuhaolam.top permanent;
}
proxy_pass http://harbor_servers;
proxy_set_header Host $host;
proxy_set_header X-Real-IP $remote_addr;
proxy_set_header X-Forwarded-For $proxy_add_x_forwarded_for;
proxy_set_header X-Forwarded-Proto $scheme;
proxy_read_timeout 300s;
}
}
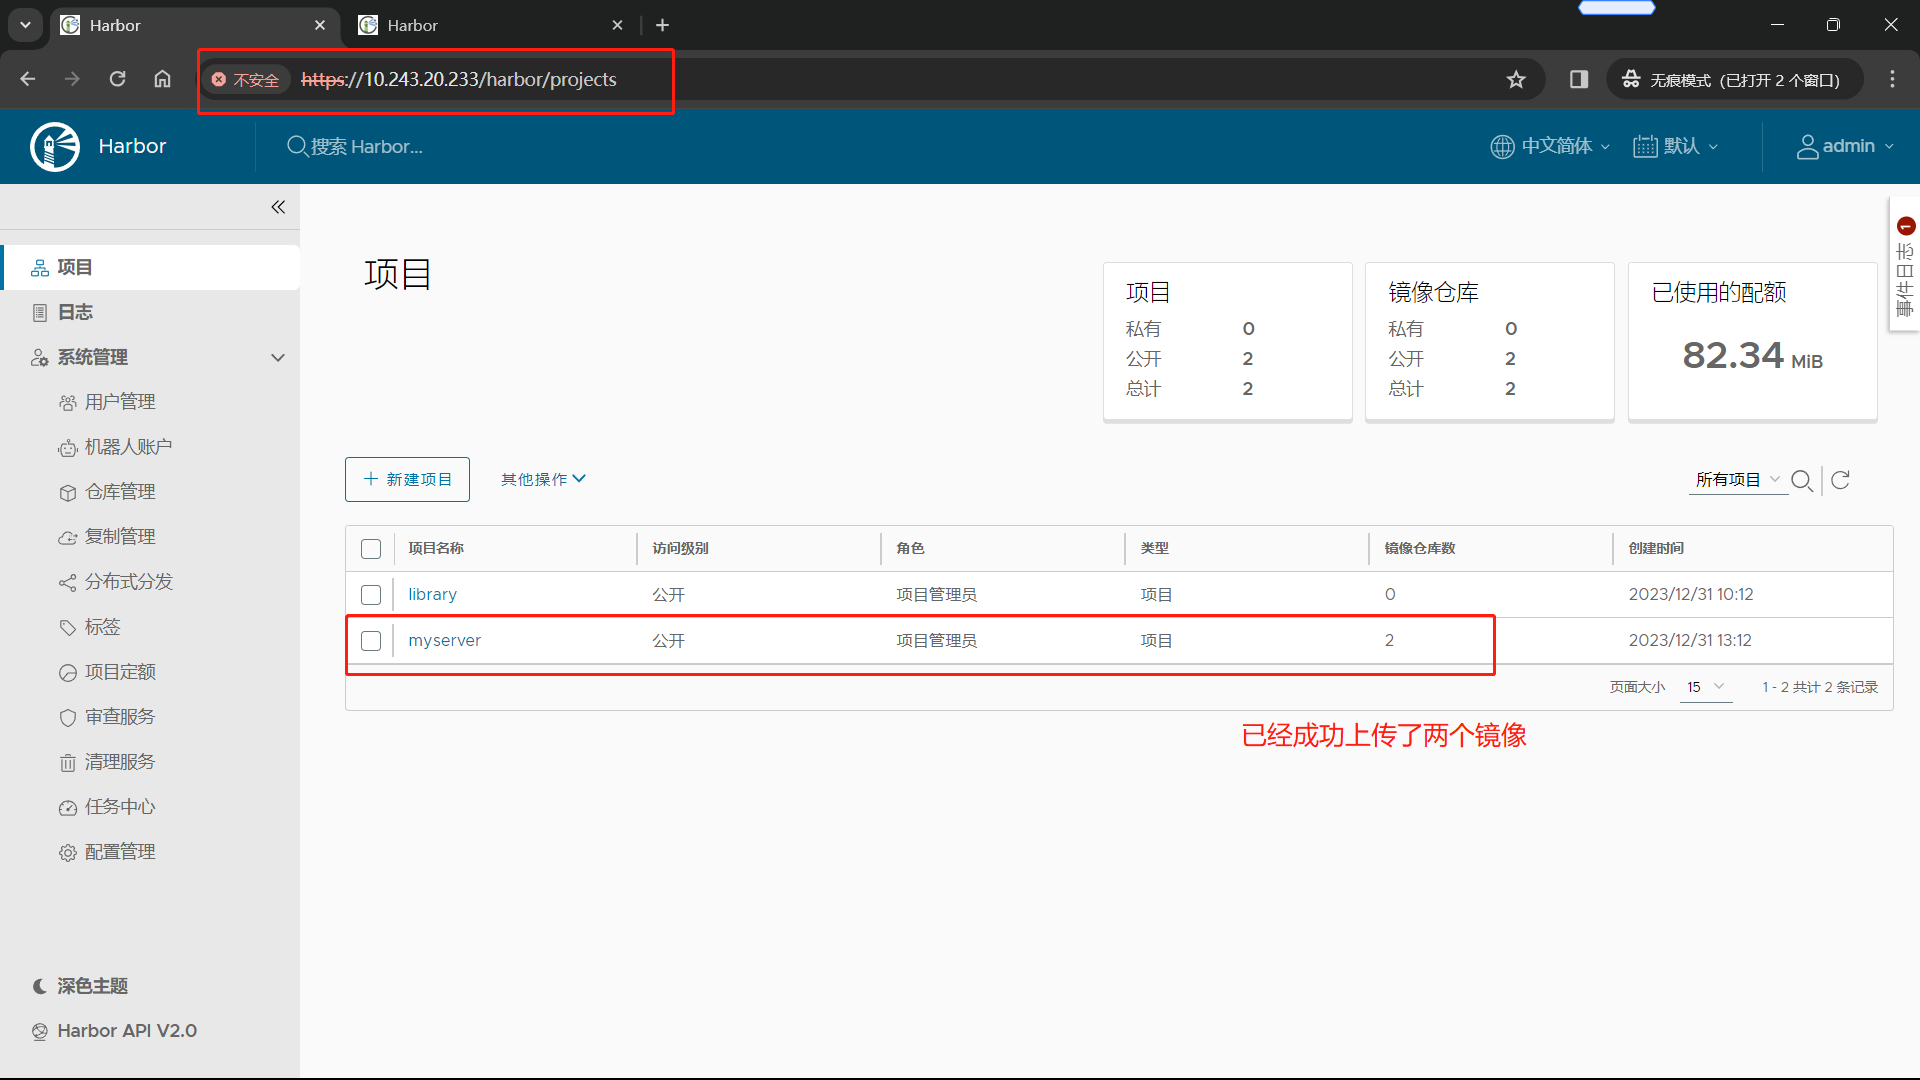
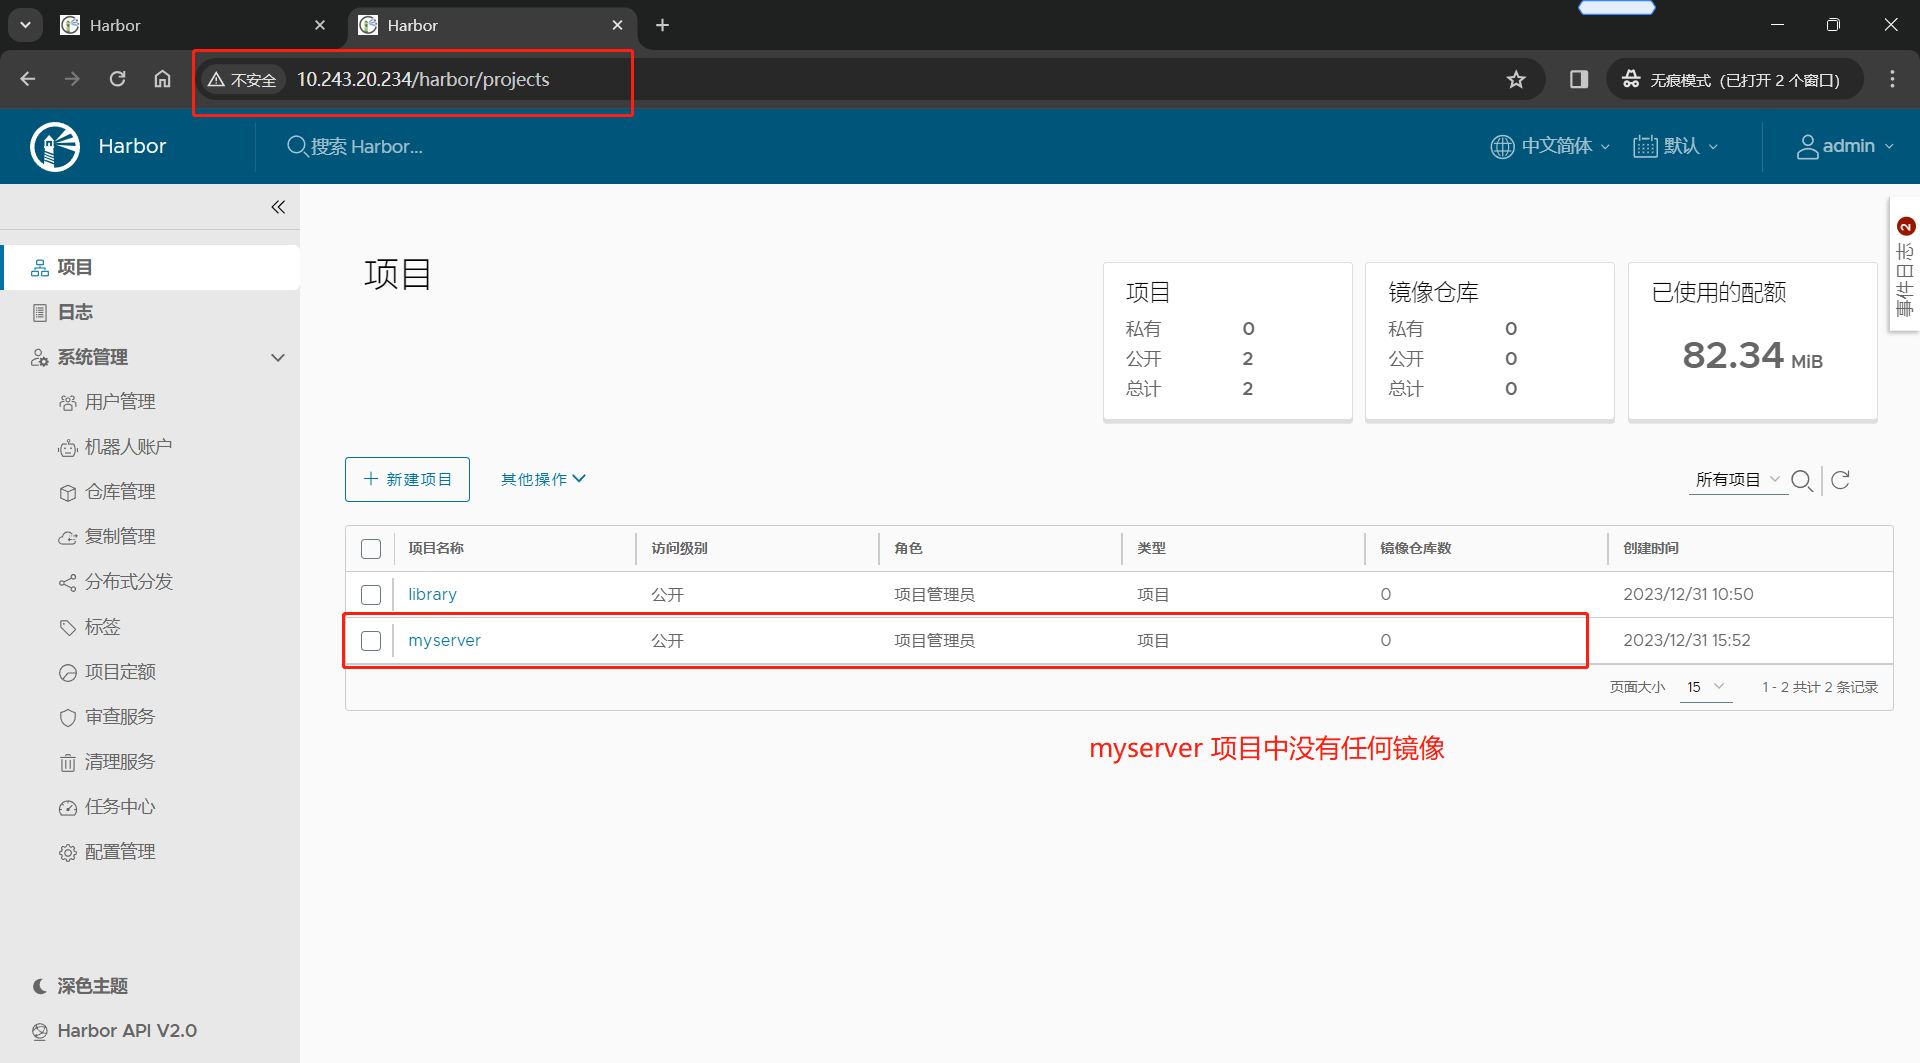
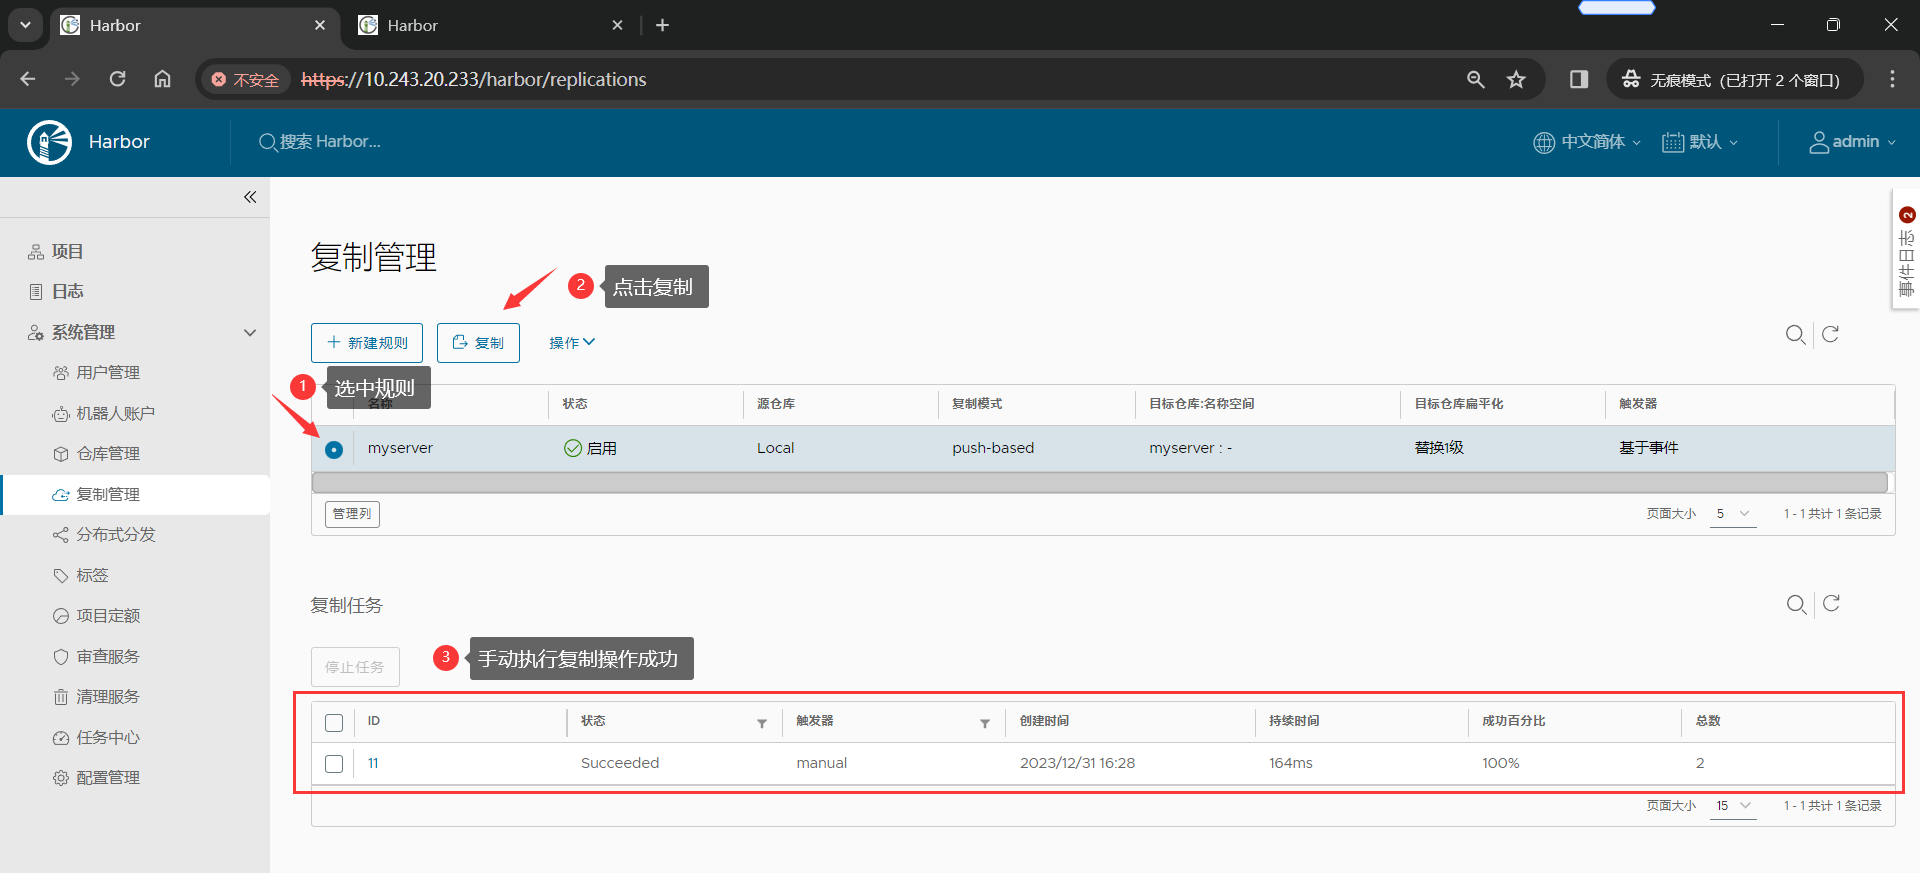
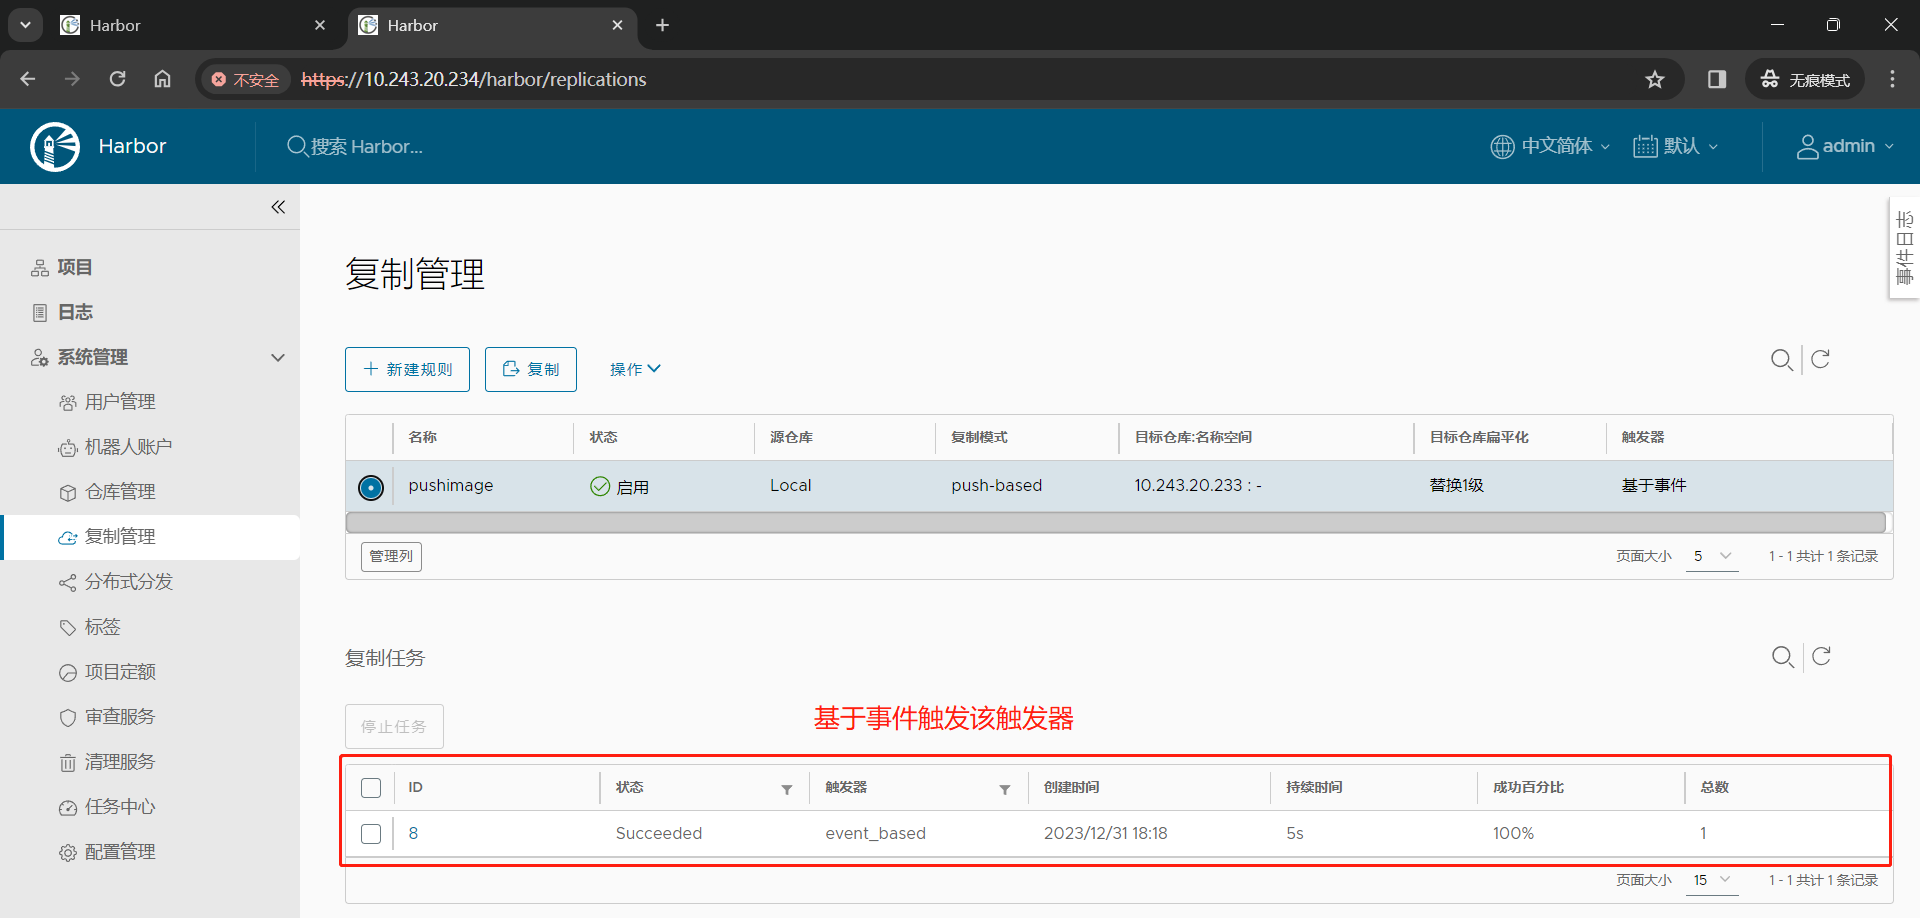
1.4.2 配置 Harbor 之间的镜像复制
:warning:==此节中harbor的镜像复制有些使用了域名,有误;如果没有配置域名则需要替换成IP地址==
(1)在浏览器输入 Harbor 主机的IP地址,然后输入用户名和密码登录 Harbor UI
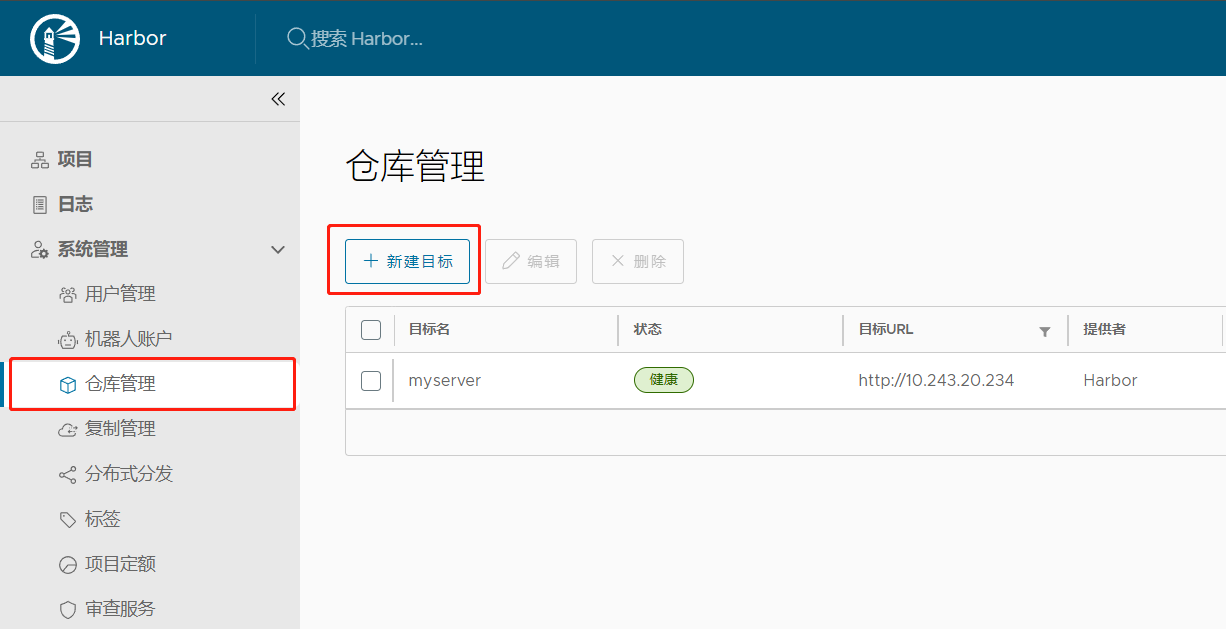
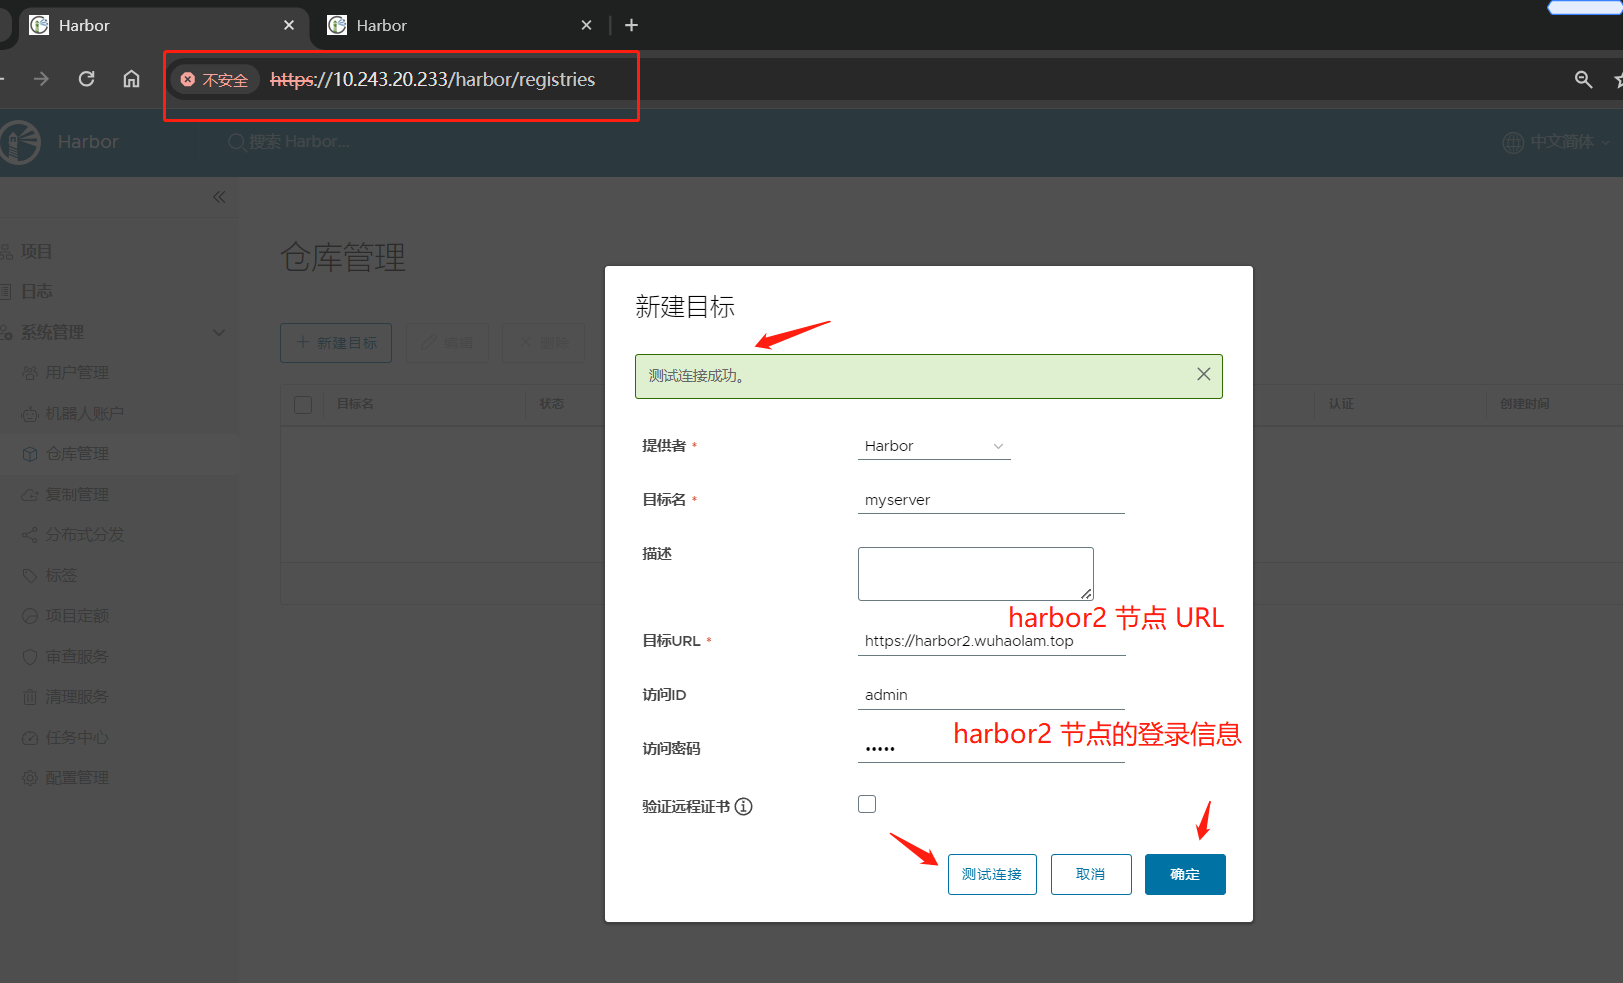
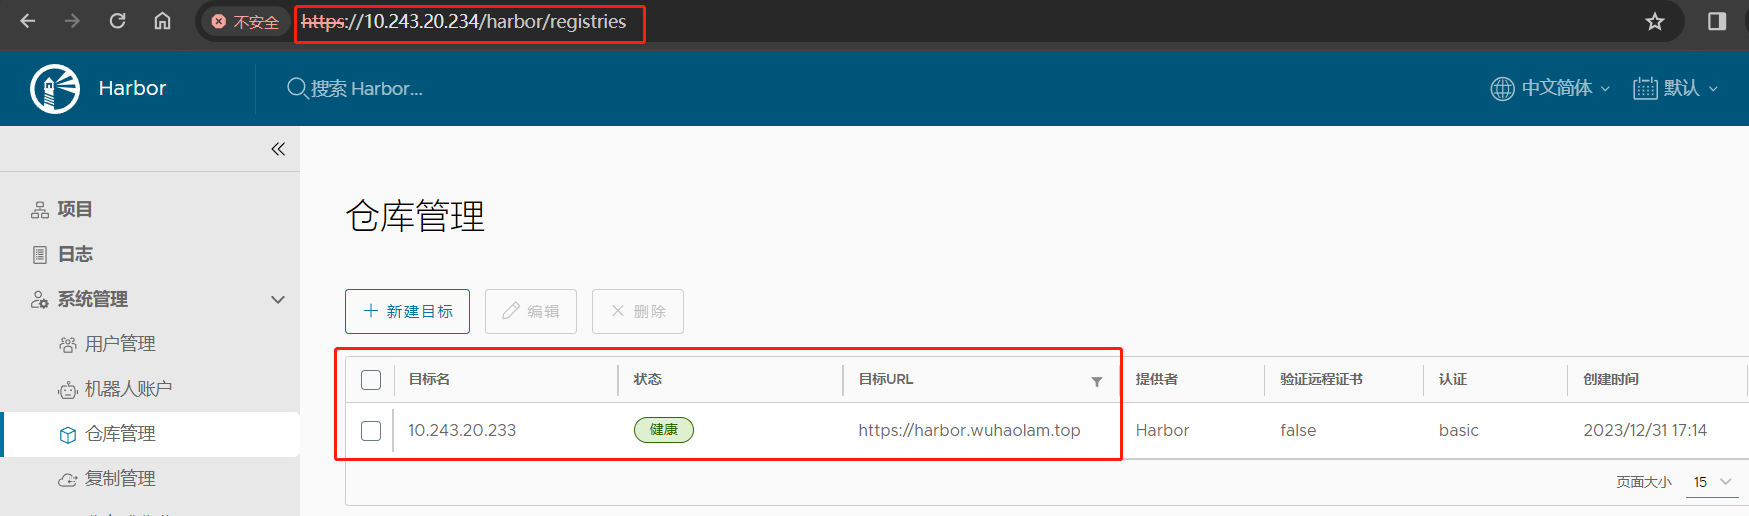
(2)在 Harbor1 节点中,仓库管理 –> 新建目标;目标创建完成后,点击确定即可
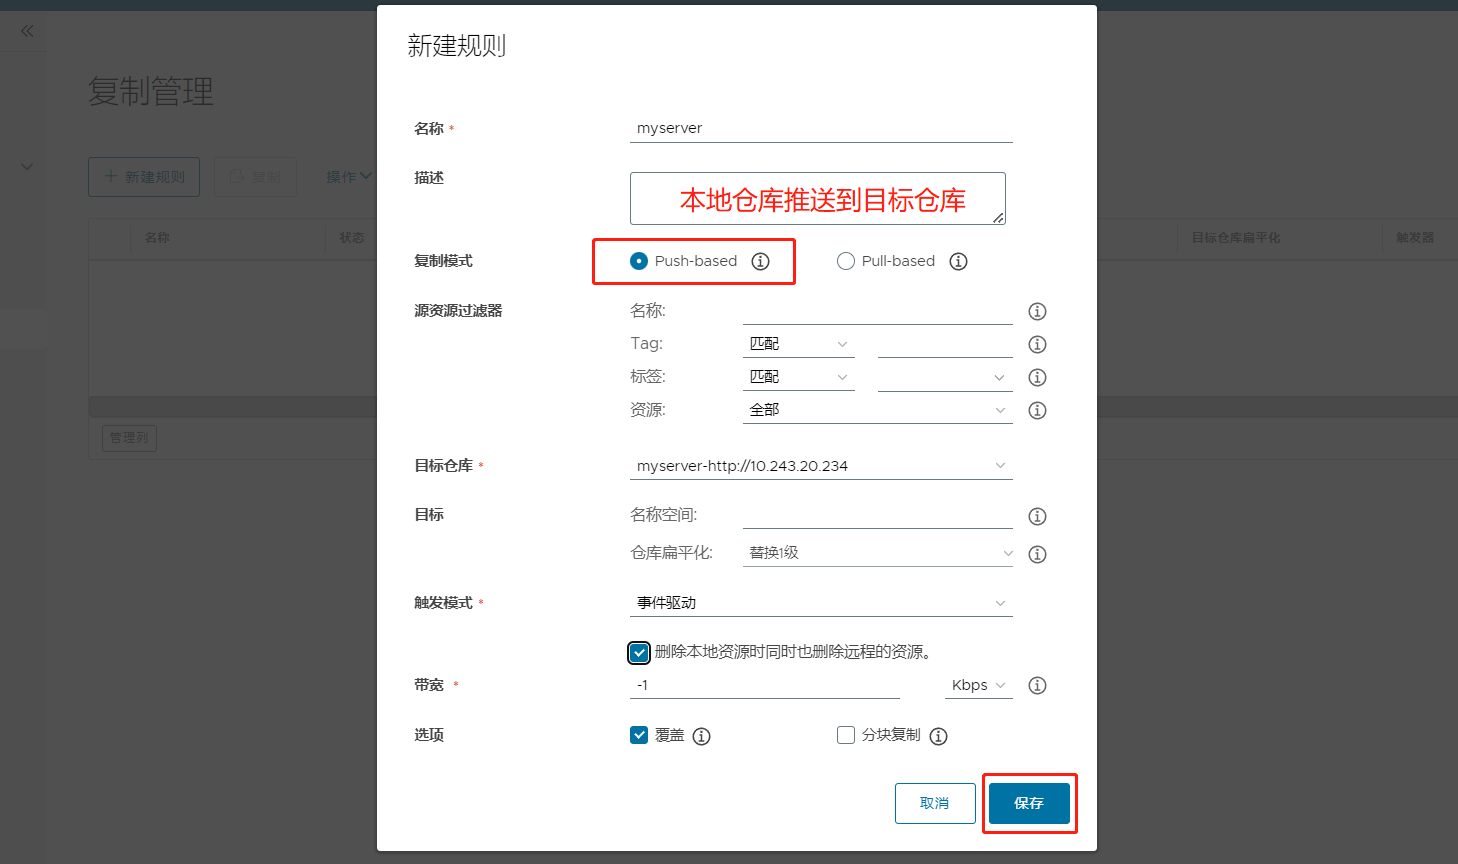
(3)点击 系统管理 –> 复制管理 –> 新建规则;
(4)手动复制验证规则
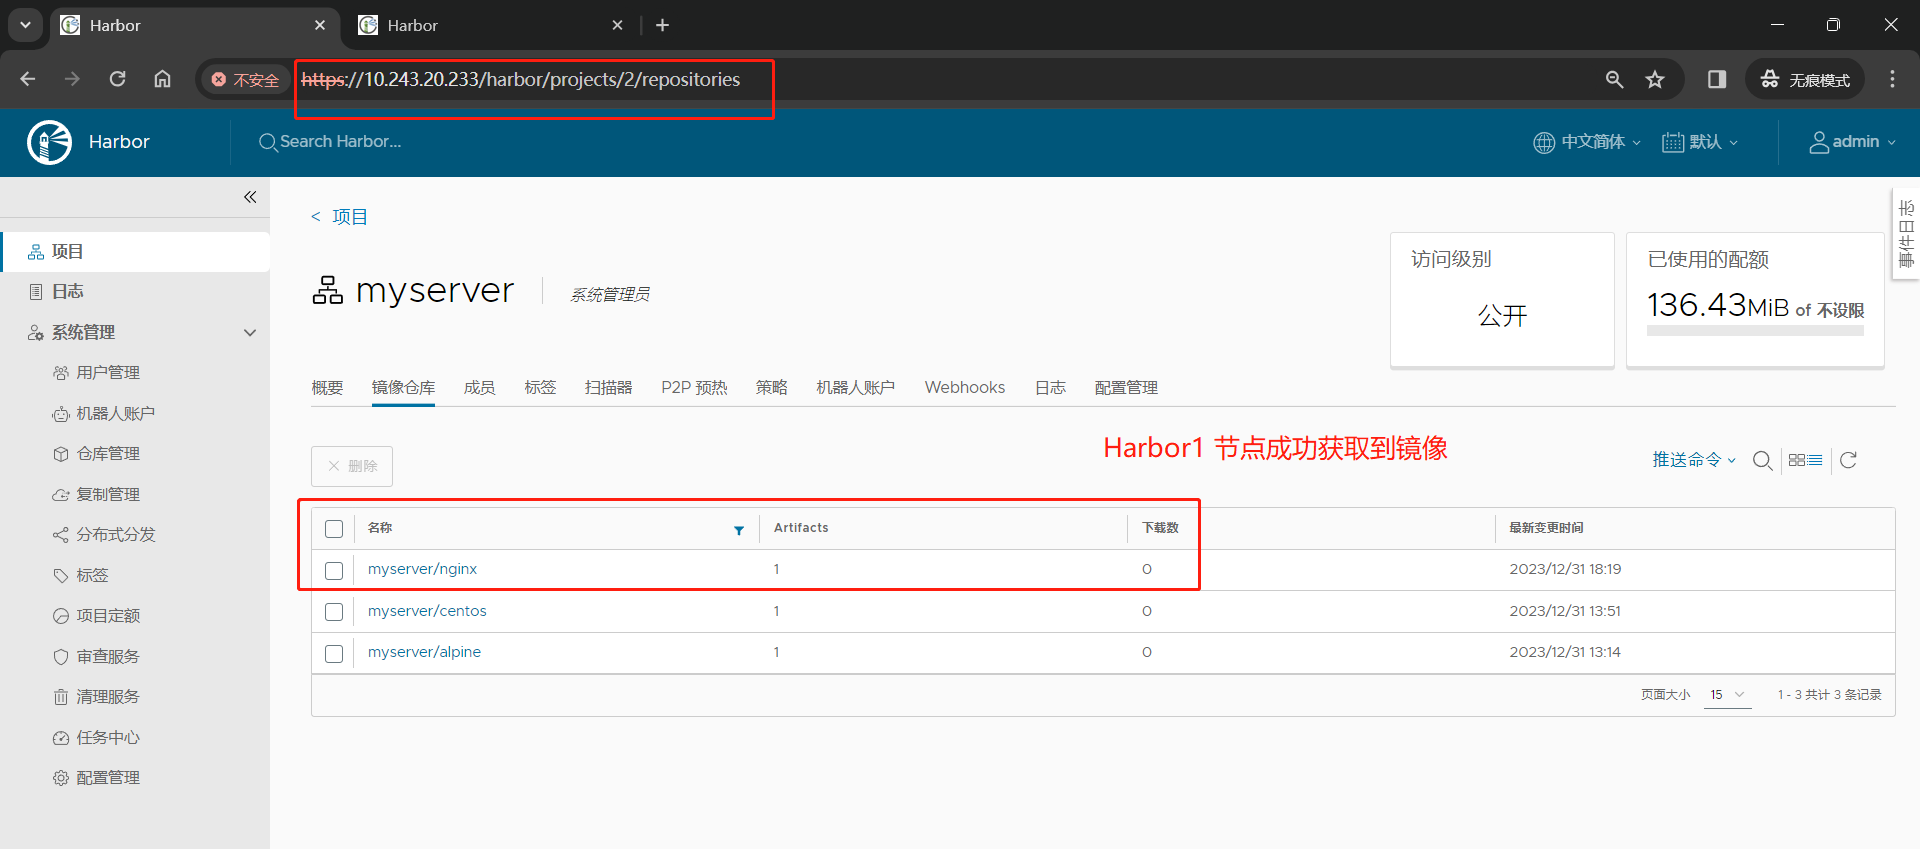
Harbor1 节点
Harbor2 节点
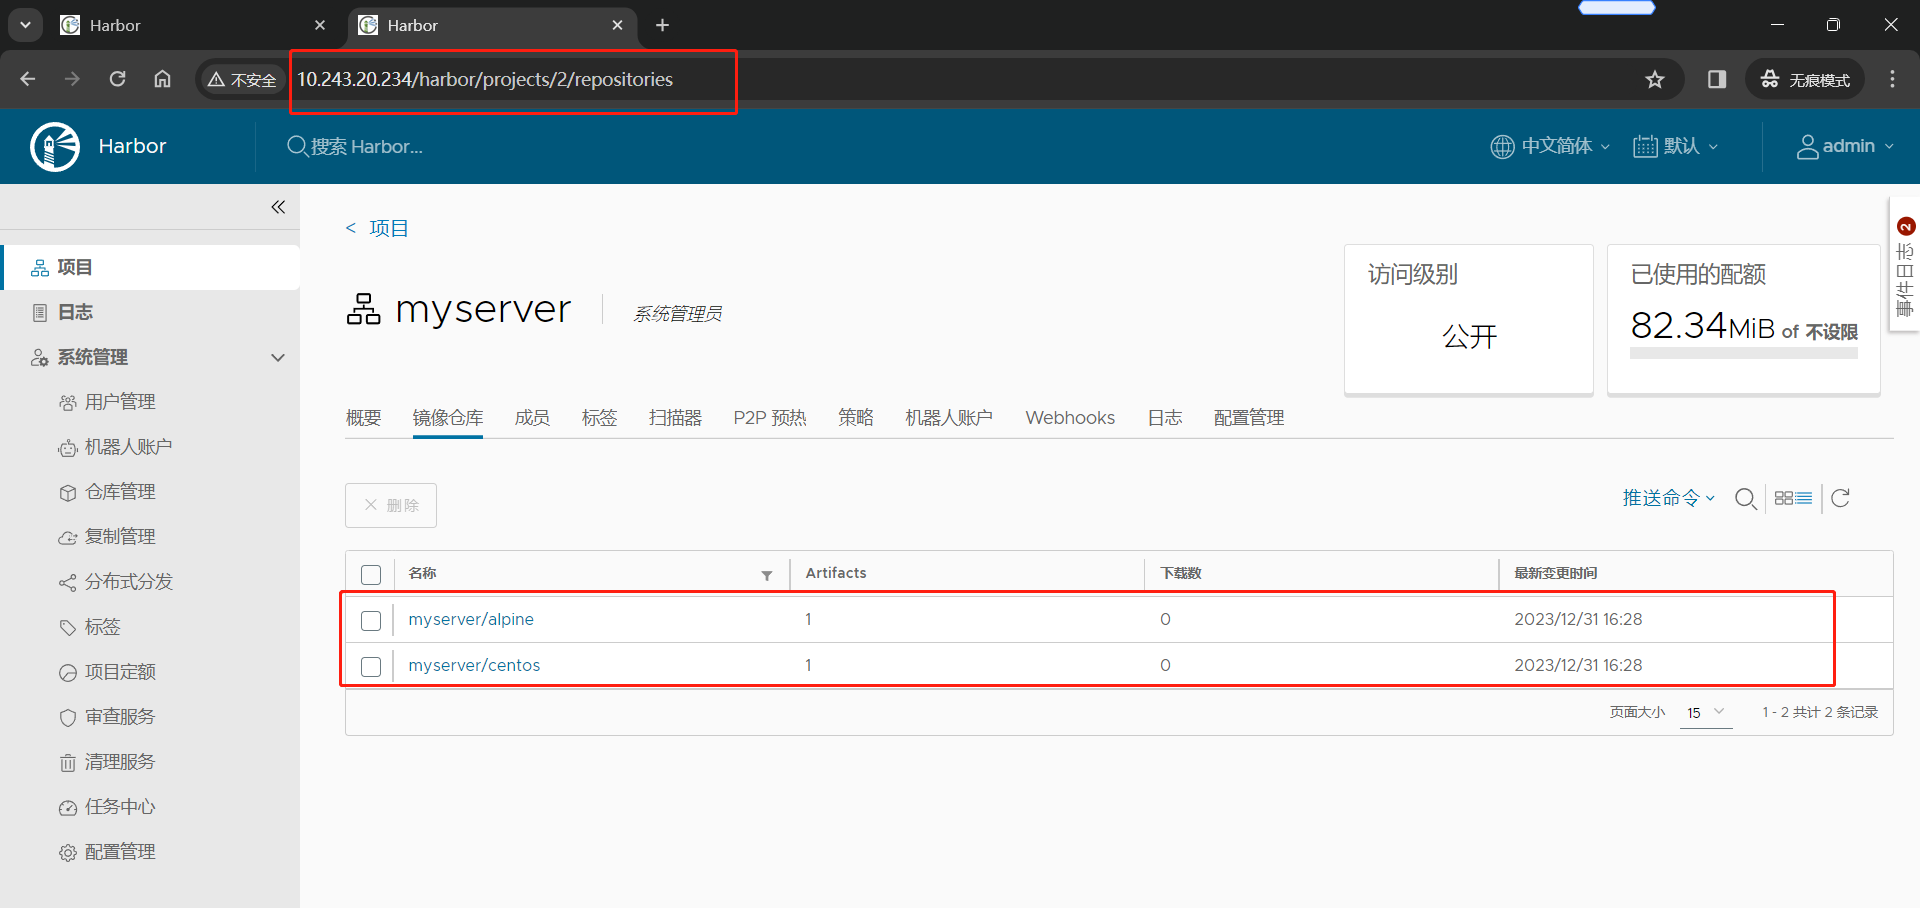
(5)在 Harbor2 节点创建等同的复制规则
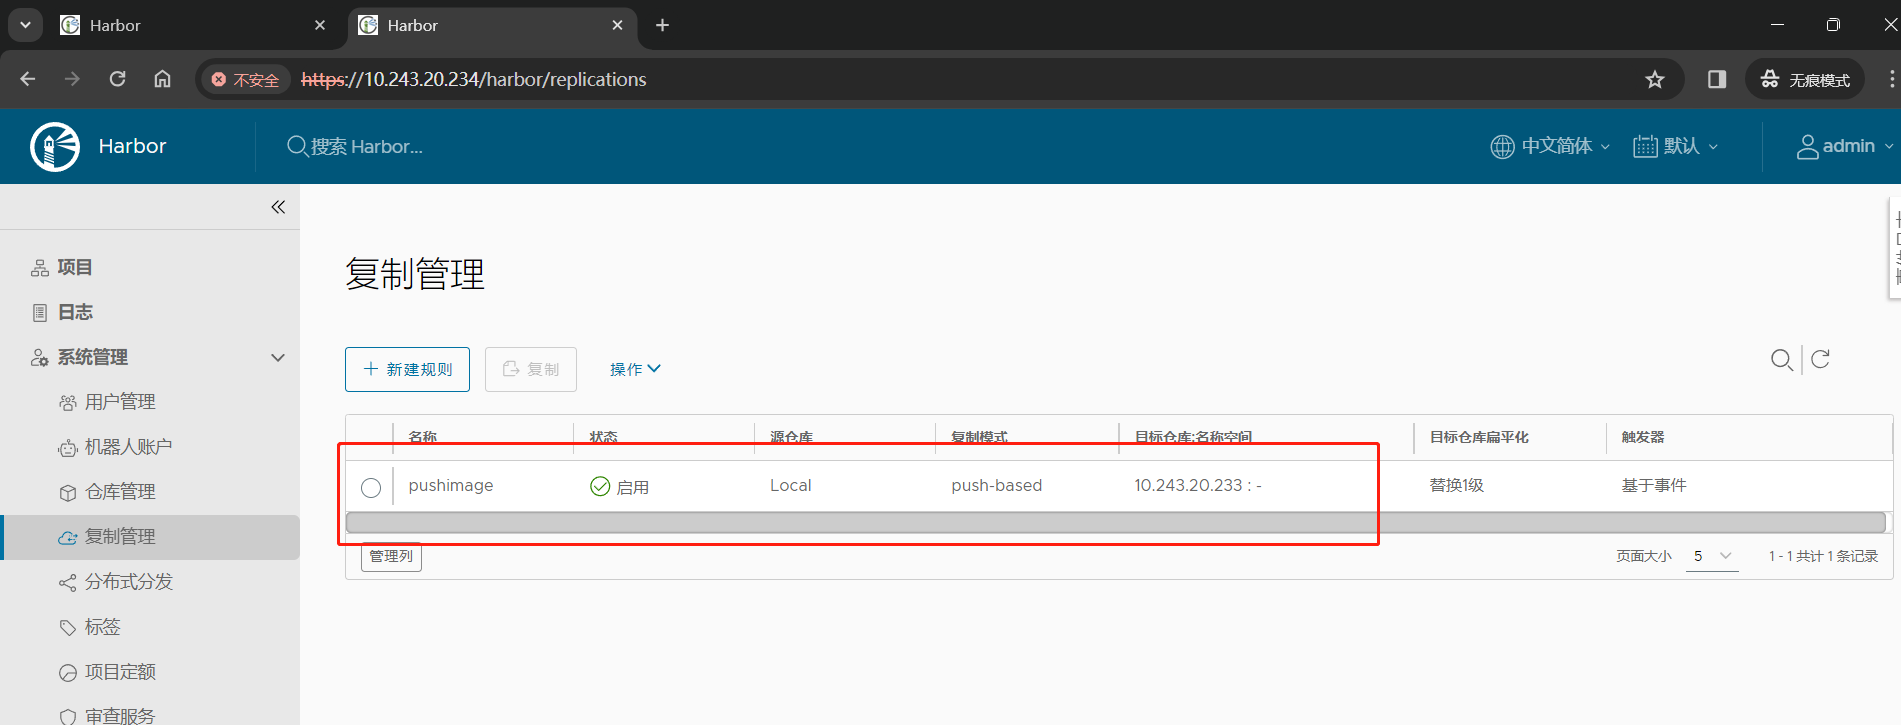
(6)推送镜像到 Harbor2 节点,测试是否可以自动推送镜像至 Harbor1节点
1 | root@k8s-harbor2-234:/apps/harbor# docker login harbor2.wuhaolam.top |
1.5 kubeasz 部署高可用 kubernets
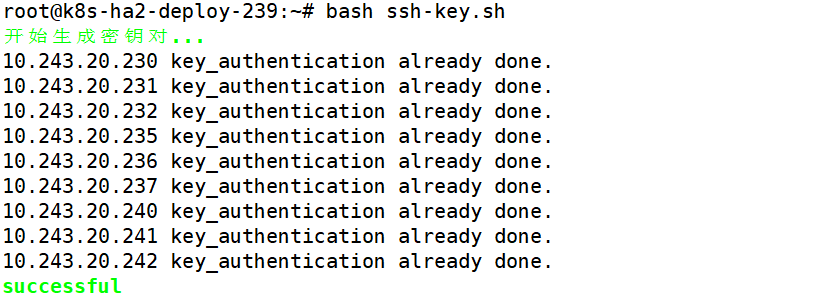
1.5.1 在部署节点上配置Ansible免密登录至master、node、etcd节点
1 | root@k8s-ha2-deploy-239:~# apt -y install ansible git |
1.5.2 在部署节点下载 kubeasz 项目及其组件
(1)下载项目源码
1 | root@k8s-ha2-deploy-239:~# wget https://github.com/easzlab/kubeasz/releases/download/3.6.1/ezdown |
(2)在部署节点安装Docker,不使用 ezdown 脚本安装,自己安装Docker
1 | Docker22.04 安装见此文章 |
(3)开始下载kubeasz项目及其组件
1 | root@k8s-ha2-deploy-239:~# ./ezdown -D |
1.5.3 生成并自定义 hosts 文件
1 | root@k8s-ha2-deploy-239:~# cd /etc/kubeasz/ |
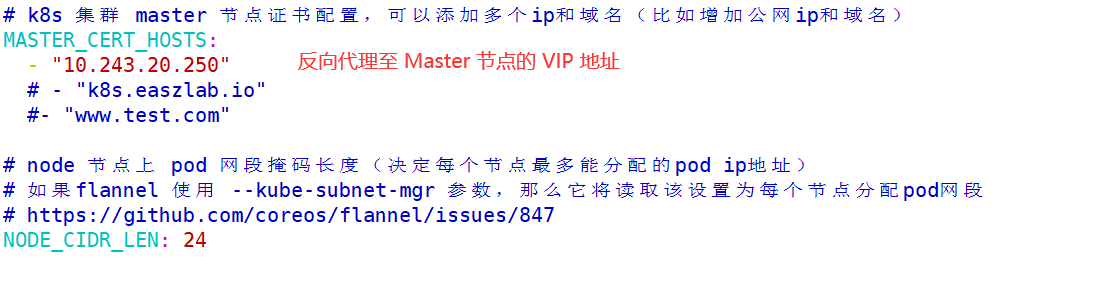
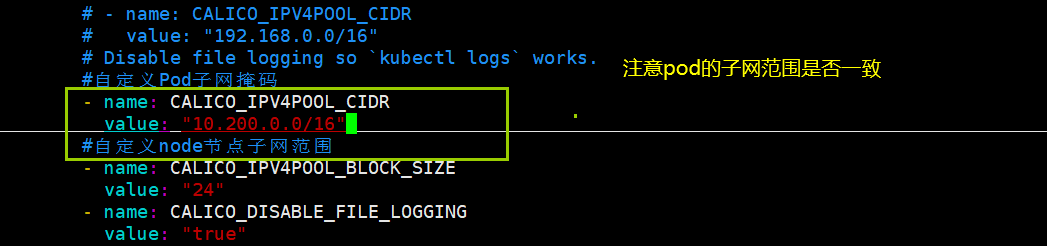
1.5.3.1 编辑生成的 Ansible hosts 文件
指定 etcd 节点、Master节点、node节点、VIP、运行时、网络组件类型、Service IP 与 pod IP 范围等配置信息。
1 | root@k8s-ha2-deploy-239:/etc/kubeasz# vim clusters/k8s-cluster1/hosts |
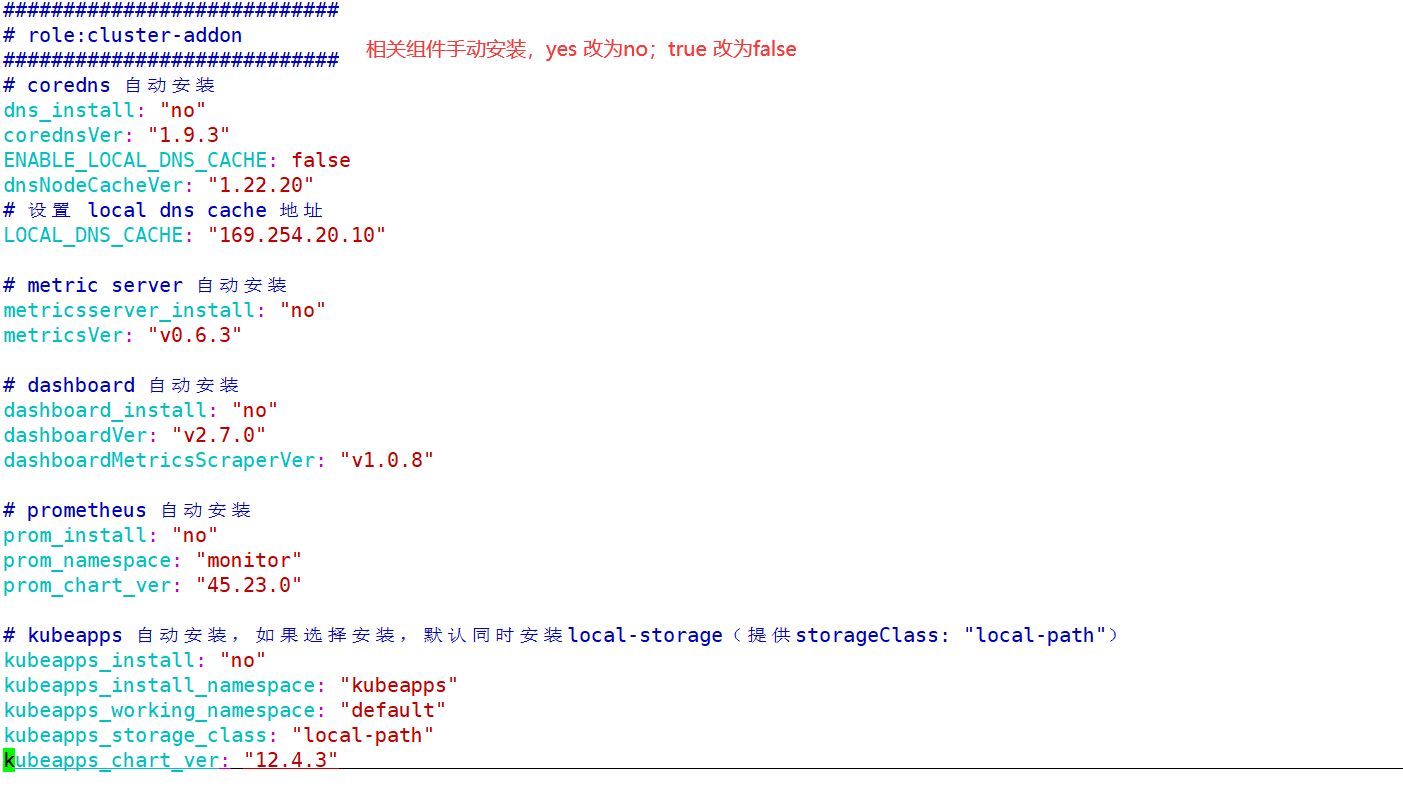
1.5.3.2 编辑集群 config.yml 文件
1 | root@k8s-ha2-deploy-239:/etc/kubeasz# vim clusters/k8s-cluster1/config.yml |
1.5.4 部署 k8s 集群
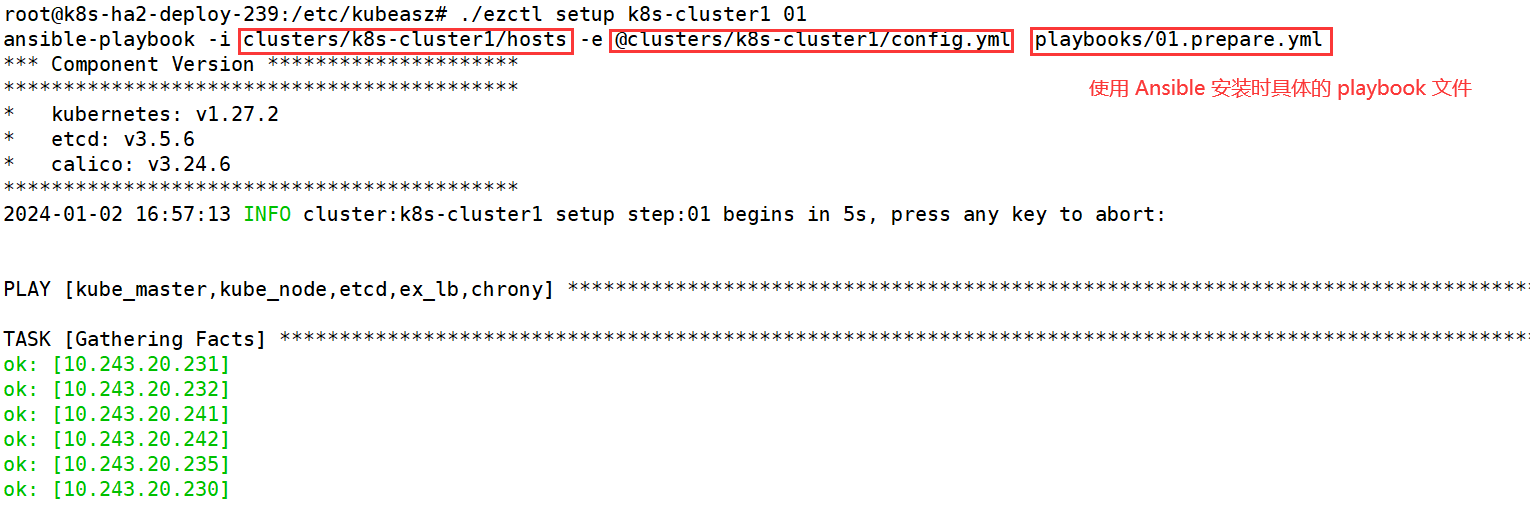
1.5.4.1 环境初始化
1 | root@k8s-ha2-deploy-239:/etc/kubeasz# ./ezctl setup k8s-cluster1 01 |

命令使用帮助
root@k8s-ha2-deploy-239:/etc/kubeasz# ./ezctl –helproot@k8s-ha2-deploy-239:/etc/kubeasz# ./ezctl setup –help
Usage: ezctl setup
available steps:
01 prepare to prepare CA/certs & kubeconfig & other system settings
02 etcd to setup the etcd cluster
03 container-runtime to setup the container runtime(docker or containerd)
04 kube-master to setup the master nodes
05 kube-node to setup the worker nodes
06 network to setup the network plugin
07 cluster-addon to setup other useful plugins
90 all to run 01~07 all at once
10 ex-lb to install external loadbalance for accessing k8s from outside
11 harbor to install a new harbor server or to integrate with an existed oneexamples: ./ezctl setup test-k8s 01 (or ./ezctl setup test-k8s prepare)
./ezctl setup test-k8s 02 (or ./ezctl setup test-k8s etcd)
./ezctl setup test-k8s all
./ezctl setup test-k8s 04 -t restart_master
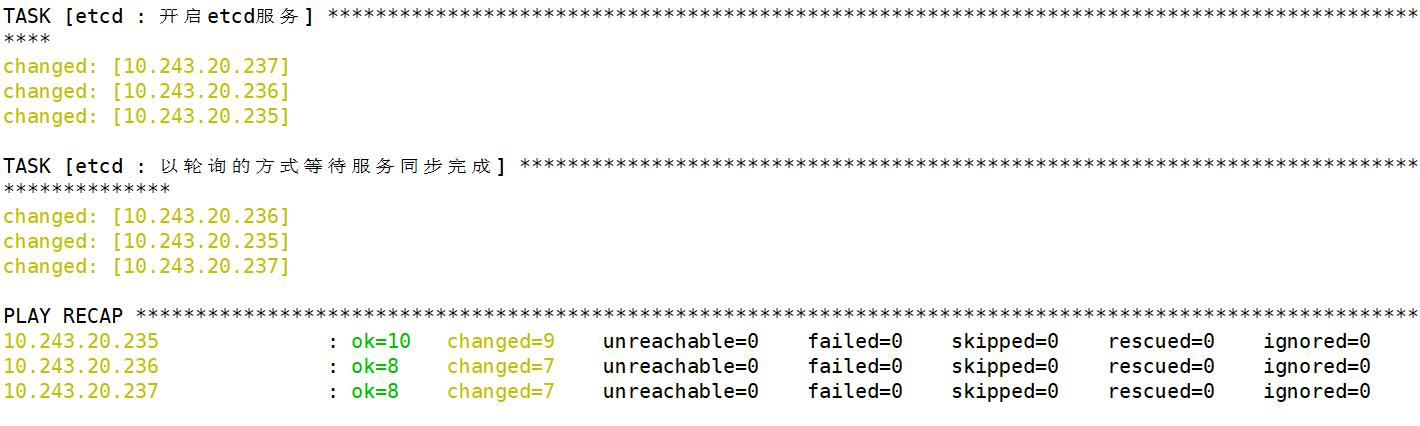
1.5.4.2 部署 etcd 集群
1 | root@k8s-ha2-deploy-239:/etc/kubeasz# ./ezctl setup k8s-cluster1 02 |
1 | # 在其中一个 etcd 服务器验证集群状态 |
1 | # 查看成员列表 |

1 | # 验证节点心跳状态 |
1 | # 查看 etcd 详细信息 |
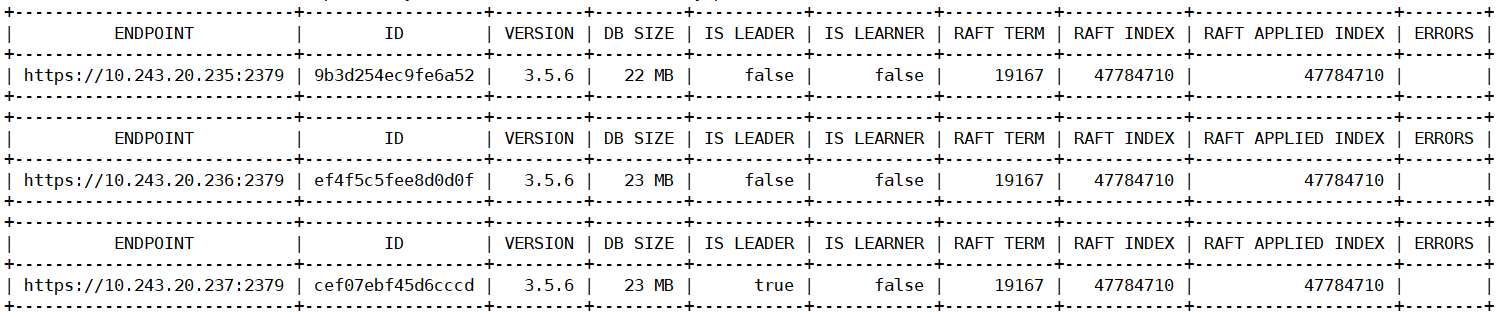
etcd 服务安装完成后,会监听在 2379 和 2380 两个端口
2379 是 客户端通信使用
2380 是 etcd 集群之间通信使用
1.5.4.3 部署容器运行时 containerd
(1)验证基础容器镜像
1 | root@k8s-ha2-deploy-239:/etc/kubeasz# grep SANDBOX_IMAGE ./clusters/* -R |
(2)配置本地域名仓库解析,如果配置了 DNS 服务器,可不用配置
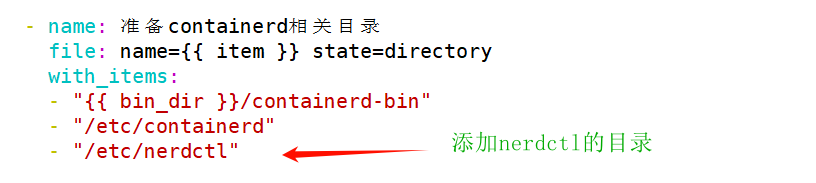
1 | root@k8s-ha2-deploy-239:/etc/kubeasz# vim roles/containerd/tasks/main.yml |
(3)配置 nerdctl 客户端
1 | root@k8s-ha2-deploy-239:~# ls nerdctl-1.4.0-linux-amd64.tar.gz |

nerdctl 软件包下载
https://github.com/containerd/nerdctl/releases
(4)开始部署运行时
1 | root@k8s-ha2-deploy-239:/etc/kubeasz# ./ezctl setup k8s-cluster1 03 |
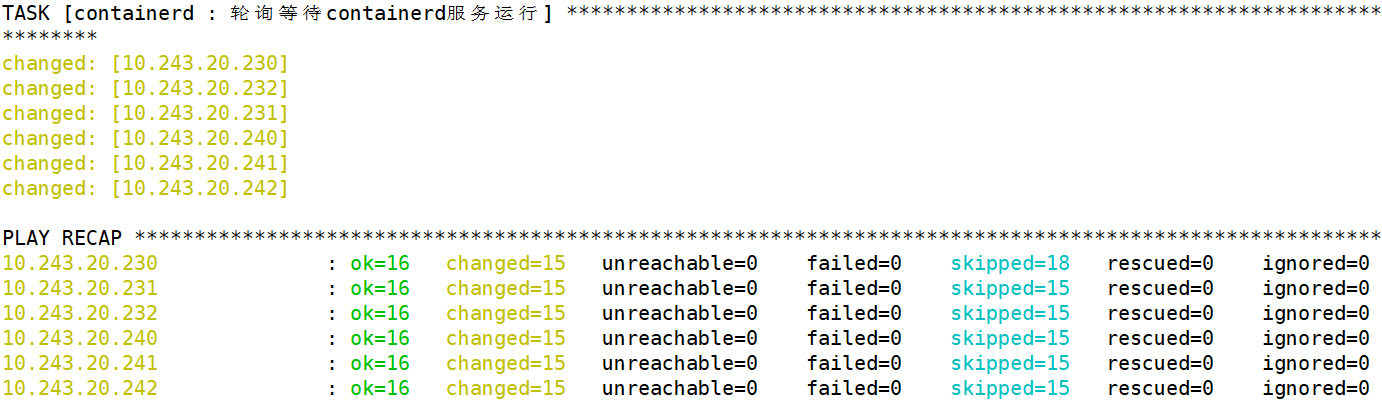
(5)验证 containerd 服务
1 | root@k8s-master1-230:~# ln -sv /usr/local/bin/containerd-bin/* /usr/local/bin/ |
1.5.4.4 部署 k8s Master 节点
1 | root@k8s-ha2-deploy-239:/etc/kubeasz# ./ezctl setup k8s-cluster1 04 |

1.5.4.5 部署 k8s node 节点
1 | root@k8s-ha2-deploy-239:/etc/kubeasz# ./ezctl setup k8s-cluster1 05 |

1.5.4.6 部署网络服务组件 calico(手动部署)
1 | # 准备calico部署文件 |

1 | # 部署calico |
1.6 部署 k8s 内部 DNS 服务-CoreDNS
CoreDNS 官网:https://coredns.io/
部署清单文件:https://github.com/coredns/deployment/tree/master/kubernetes
CoreDNS 源文件来自于 k8s 源码文件中 kubernetes-1.27.9\cluster\addons\dns\coredns
https://github.com/kubernetes/kubernetes/archive/refs/tags/v1.27.9.zip
1.6.1 修改 CoreDNS 的 yaml 文件
(1)修改域名解析相关配置
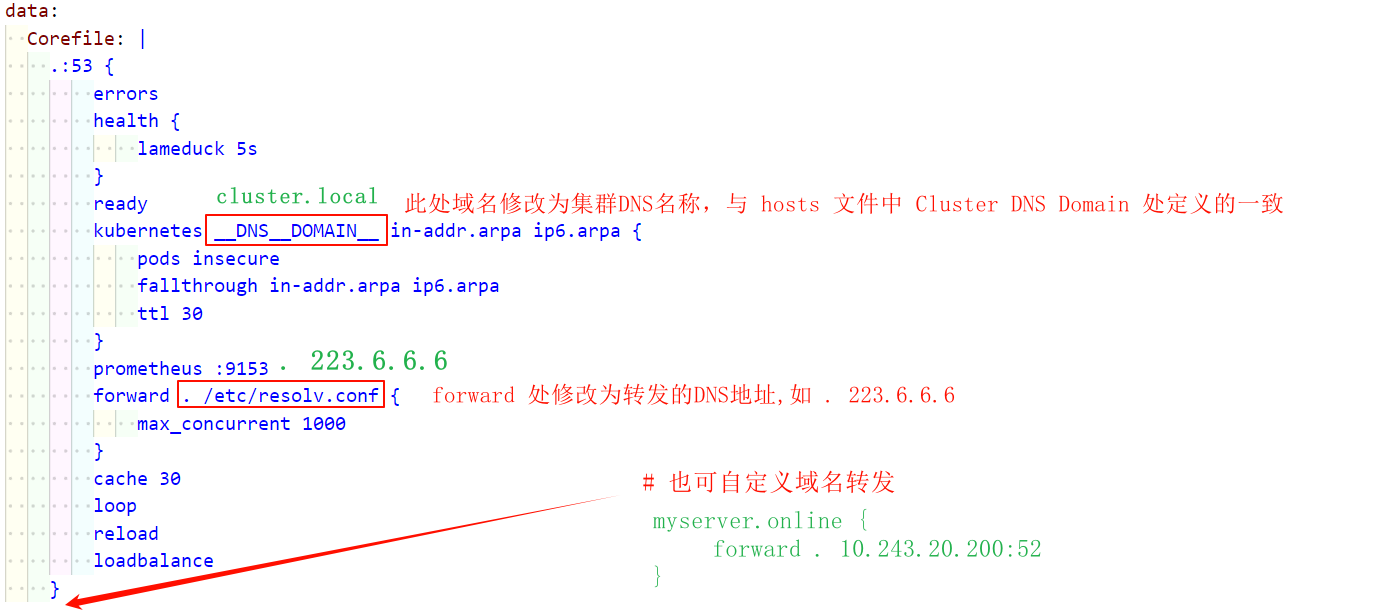
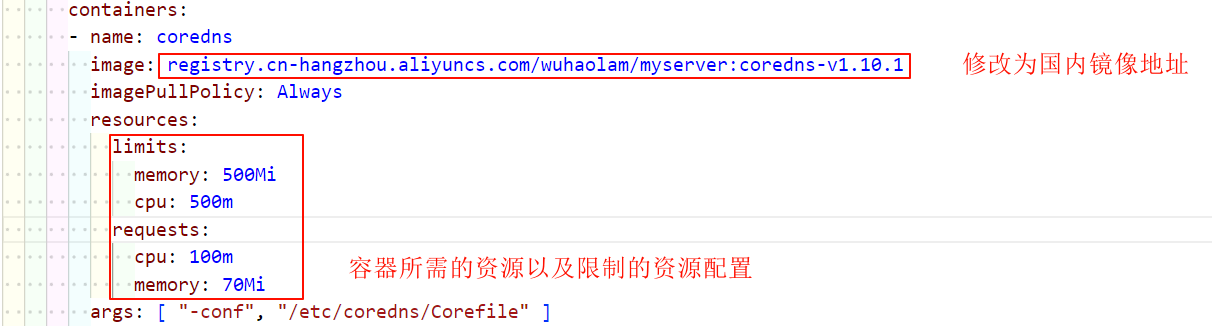
(2)指定CoreDNS的镜像地址以及资源限制(生产时资源建议调大)
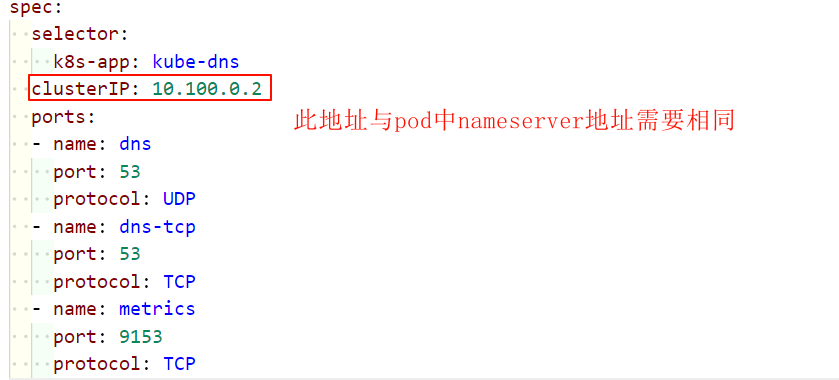
(3)修改集群的 DNS 地址
1 | # 修改的地址需要与 pod 中域名地址相同 |
1.6.2 部署 CoreDNS 服务
(1)开始部署
1 | root@k8s-ha2-deploy-239:~# kubectl apply -f coredns-v1.10.1.yaml |
2
3
4
5
6
7
8
9
10
11
12
13
14
15
16
17
18
19
20
21
22
23
24
25
26
27
28
29
30
31
32
33
34
35
36
37
38
39
40
41
42
43
44
45
46
47
48
49
50
51
52
53
54
55
56
57
58
59
60
61
62
63
64
65
66
67
68
69
70
71
72
73
74
75
76
77
78
79
80
81
82
83
84
85
86
87
88
89
90
91
92
93
94
95
96
97
98
99
100
101
102
103
104
105
106
107
108
109
110
111
112
113
114
115
116
117
118
119
120
121
122
123
124
125
126
127
128
129
130
131
132
133
134
135
136
137
138
139
140
141
142
143
144
145
146
147
148
149
150
151
152
153
154
155
156
157
158
159
160
161
162
163
164
165
166
167
168
169
170
171
172
173
174
175
176
177
178
179
180
181
182
183
184
185
186
187
188
189
190
191
192
193
194
195
196
197
198
199
200
201
202
203
204
205
206
207
208
209
210
211
212
213
214
215
216
217
218
219
220
221
222
223
224
225
226
227
228
# __MACHINE_GENERATED_WARNING__
apiVersion: v1
kind: ServiceAccount
metadata:
name: coredns
namespace: kube-system
labels:
kubernetes.io/cluster-service: "true"
addonmanager.kubernetes.io/mode: Reconcile
apiVersion: rbac.authorization.k8s.io/v1
kind: ClusterRole
metadata:
labels:
kubernetes.io/bootstrapping: rbac-defaults
addonmanager.kubernetes.io/mode: Reconcile
name: system:coredns
rules:
- apiGroups:
- ""
resources:
- endpoints
- services
- pods
- namespaces
verbs:
- list
- watch
- apiGroups:
- ""
resources:
- nodes
verbs:
- get
- apiGroups:
- discovery.k8s.io
resources:
- endpointslices
verbs:
- list
- watch
apiVersion: rbac.authorization.k8s.io/v1
kind: ClusterRoleBinding
metadata:
annotations:
rbac.authorization.kubernetes.io/autoupdate: "true"
labels:
kubernetes.io/bootstrapping: rbac-defaults
addonmanager.kubernetes.io/mode: EnsureExists
name: system:coredns
roleRef:
apiGroup: rbac.authorization.k8s.io
kind: ClusterRole
name: system:coredns
subjects:
- kind: ServiceAccount
name: coredns
namespace: kube-system
apiVersion: v1
kind: ConfigMap
metadata:
name: coredns
namespace: kube-system
labels:
addonmanager.kubernetes.io/mode: EnsureExists
data:
Corefile: |
.:53 {
errors
health {
lameduck 5s
}
ready
kubernetes cluster.local in-addr.arpa ip6.arpa {
pods insecure
fallthrough in-addr.arpa ip6.arpa
ttl 30
}
prometheus :9153
#forward . /etc/resolv.conf {
forward . 223.6.6.6 {
max_concurrent 1000
}
cache 300
loop
reload
loadbalance
}
myserver.online {
forward . 172.16.16.16:53
}
apiVersion: apps/v1
kind: Deployment
metadata:
name: coredns
namespace: kube-system
labels:
k8s-app: kube-dns
kubernetes.io/cluster-service: "true"
addonmanager.kubernetes.io/mode: Reconcile
kubernetes.io/name: "CoreDNS"
spec:
# replicas: not specified here:
# 1. In order to make Addon Manager do not reconcile this replicas parameter.
# 2. Default is 1.
# 3. Will be tuned in real time if DNS horizontal auto-scaling is turned on.
strategy:
type: RollingUpdate
rollingUpdate:
maxUnavailable: 1
selector:
matchLabels:
k8s-app: kube-dns
template:
metadata:
labels:
k8s-app: kube-dns
spec:
securityContext:
seccompProfile:
type: RuntimeDefault
priorityClassName: system-cluster-critical
serviceAccountName: coredns
affinity:
podAntiAffinity:
preferredDuringSchedulingIgnoredDuringExecution:
- weight: 100
podAffinityTerm:
labelSelector:
matchExpressions:
- key: k8s-app
operator: In
values: ["kube-dns"]
topologyKey: kubernetes.io/hostname
tolerations:
- key: "CriticalAddonsOnly"
operator: "Exists"
nodeSelector:
kubernetes.io/os: linux
containers:
- name: coredns
image: registry.cn-hangzhou.aliyuncs.com/zhangshijie/coredns:v1.10.1
imagePullPolicy: IfNotPresent
resources:
limits:
cpu: 500m
memory: 512Mi
requests:
cpu: 100m
memory: 70Mi
args: [ "-conf", "/etc/coredns/Corefile" ]
volumeMounts:
- name: config-volume
mountPath: /etc/coredns
readOnly: true
ports:
- containerPort: 53
name: dns
protocol: UDP
- containerPort: 53
name: dns-tcp
protocol: TCP
- containerPort: 9153
name: metrics
protocol: TCP
livenessProbe:
httpGet:
path: /health
port: 8080
scheme: HTTP
initialDelaySeconds: 60
timeoutSeconds: 5
successThreshold: 1
failureThreshold: 5
readinessProbe:
httpGet:
path: /ready
port: 8181
scheme: HTTP
securityContext:
allowPrivilegeEscalation: false
capabilities:
add:
- NET_BIND_SERVICE
drop:
- all
readOnlyRootFilesystem: true
dnsPolicy: Default
volumes:
- name: config-volume
configMap:
name: coredns
items:
- key: Corefile
path: Corefile
apiVersion: v1
kind: Service
metadata:
name: kube-dns
namespace: kube-system
annotations:
prometheus.io/port: "9153"
prometheus.io/scrape: "true"
labels:
k8s-app: kube-dns
kubernetes.io/cluster-service: "true"
addonmanager.kubernetes.io/mode: Reconcile
kubernetes.io/name: "CoreDNS"
spec:
selector:
k8s-app: kube-dns
clusterIP: 10.100.0.2
ports:
- name: dns
port: 53
protocol: UDP
- name: dns-tcp
port: 53
protocol: TCP
- name: metrics
port: 9153
protocol: TCP
(2)测试域名解析服务
1 | root@k8s-ha2-deploy-239:/etc/kubeasz# kubectl exec -it net-test1 sh |