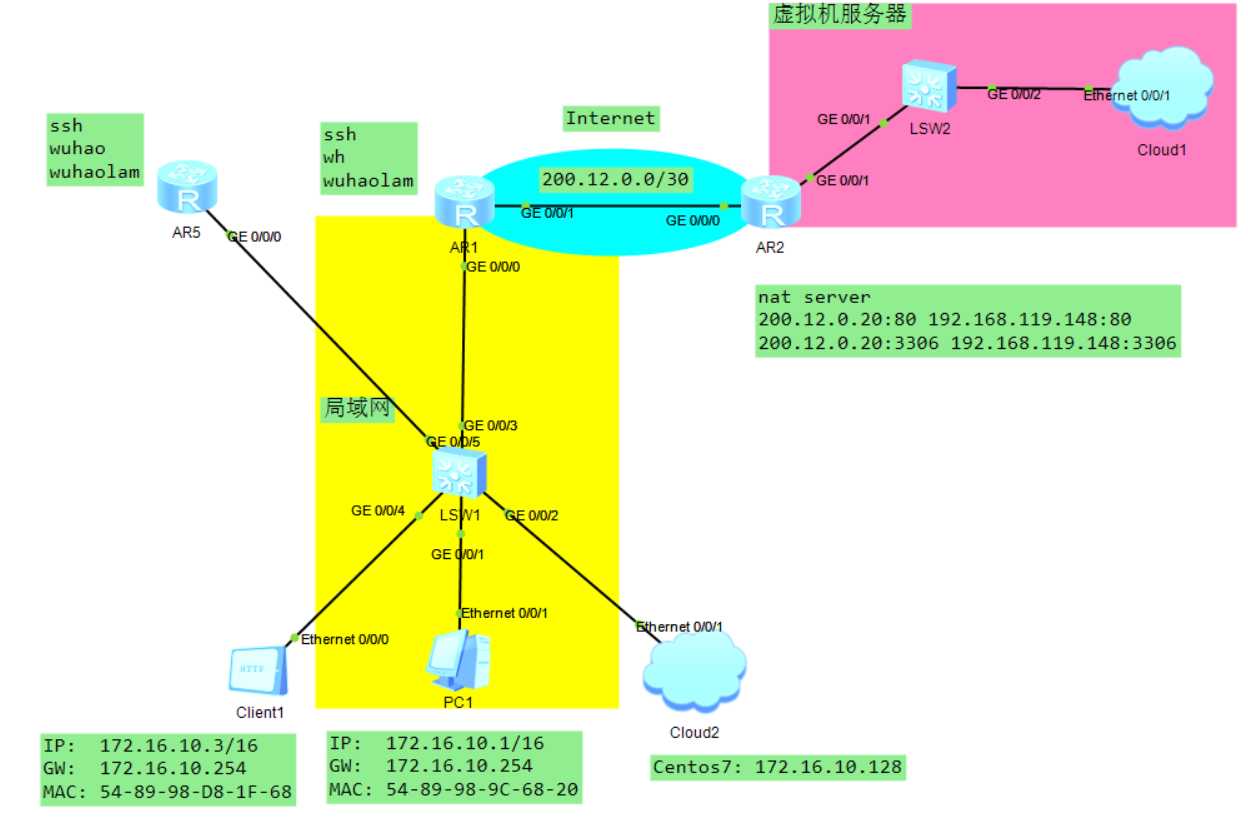
【实验需求】
现需要对局域网中的网络设备进行定期备份,以便在设备出现故障时可以有效的进行恢复。
【实验环境】
1
2
3
4
5
6
7
8
9
10
11
12
13
14
15
16
17
18
19
20
21
22
23
1、在 Centos7 上执行脚本来对 AR1 和 AR5 设备的配置文件备份到 Centos7 服务器上 2、AR1 和 AR5 均已经配置了 SSH 远程登录 https://blog.csdn.net/liwangjin0116/article/details/126596693 <R5>dis ip int b | include GigabitEthernet0/0/0 Interface IP Address/Mask Physical Protocol GigabitEthernet0/0/0 172.16.10.5/24 up up <R1>dis ip int b | include GigabitEthernet0/0/0 Interface IP Address/Mask Physical Protocol GigabitEthernet0/0/0 172.16.10.254/16 up up [root@centos7 ~] 3: ens38: <BROADCAST,MULTICAST,UP,LOWER_UP> mtu 1500 qdisc pfifo_fast state UP group default qlen 1000 link /ether 00:0c:29:b6:2b:56 brd ff:ff:ff:ff:ff:ff inet 172.16.10.128/16 brd 172.16.255.255 scope global noprefixroute ens38 valid_lft forever preferred_lft forever inet6 fe80::20c:29ff:feb6:2b56/64 scope link valid_lft forever preferred_lft forever https://blog.csdn.net/liwangjin0116/article/details/126596693
【实验过程】
1、在 Centos7 服务器上安装所需要的软件包
2、准备自动备份的脚本
1
2
3
4
5
6
7
8
9
10
11
12
13
14
15
16
17
18
19
20
21
22
23
24
25
26
27
28
29
30
31
32
33
34
35
36
37
38
39
40
41
42
43
44
45
46
47
48
49
50
51
52
53
54
55
56
57
58
59
60
[root@centos7 network] /data/network [root@centos7 network] configure_backup.sh UserPasswd.txt [root@centos7 network] DIR="/data/network" BACKUP_DATA=`date +%F` mkdir -p /data/NetworkBackup/${BACKUP_DATA} chmod -R 777 /data/NetworkBackupsed -Ei "/server_args/s@(.*-s).*@\1 /data/NetworkBackup/${BACKUP_DATA} @" /etc/xinetd.d/tftp systemctl restart xinetd.service && echo -e "\033[1;32mservice restart success\033[0m" || { echo -e "\033[1;31mservice restart fail\033[0m" ;exit 101; } echo -e "\033[1;34mstart backup....\033[0m" IPLIST=' 172.16.10.254 172.16.10.5 ' for IP in ${IPLIST} ;do USERNAME=`grep -w ${IP} ${DIR} /UserPasswd.txt | awk '{print $2}' ` PASSWORD=`grep -w ${IP} ${DIR} /UserPasswd.txt | awk '{print $3}' ` expect >> /dev/null << EOF set timeout 10 log_file /data/NetworkBackup/${BACKUP_DATA}/${IP}.cfg spawn ssh ${USERNAME}@${IP} expect { "yes/no" { send "yes\n";exp_continue } "password" { send "${PASSWORD}\n";exp_continue } } expect "*>" { send "display cur\n" } while (1) { expect { "*---- More ----" { send " ";exp_continue } "*>*" { break } } } expect eof EOF done echo -e "\033[1;32mbackup success\033[0m" [root@centos7 network] 172.16.10.254 wh wuhaolam 172.16.10.5 wuhao wuhaolam [root@centos7 network]
3、编辑计划任务实现定时执行备份脚本
1
2
3
4
[root@centos7 network] PATH=/usr/local/sbin:/usr/local/bin:/usr/sbin:/usr/bin:/root/bin 30 15 * * * . /data/network/configure_backup.sh
【实验结果】
1
2
3
4
5
6
[root@centos7 2023-07-21] /data/NetworkBackup/2023-07-21 [root@centos7 2023-07-21] total 8.0K -rwxr-xr-x 1 root root 2.3K Jul 21 15:30 172.16.10.254.cfg -rwxr-xr-x 1 root root 1.6K Jul 21 15:30 172.16.10.5.cfg


